Ventilation might not be the first thing you think about when renting a container—but it plays a huge role in keeping your items safe and dry. Whether you’re storing furniture, tools, or equipment, knowing how to ventilate a shipping container can make all the difference in preventing moisture damage. That’s why we created a quick Container 101 video to walk you through how container ventilation works and why it matters.
Watch how our containers are designed to keep air flowing—even when they’re fully sealed.
Why Ventilation Matters in a Shipping Container
All Rent-A-Container units are wind- and water-tight. That’s a great thing when it comes to weather protection—but it also means humidity and heat can build up inside if air isn’t circulating properly.
Without proper ventilation, you may run into:
-
Moisture buildup from trapped humidity
-
Mold and mildew on boxes, equipment, or fabric
-
Stale odors inside the unit
-
Corrosion or rust on metal tools or shelving
-
Warping of cardboard, wood, or electronics
Luckily, our containers come ready to help manage those risks.
Built-In Ventilation: What’s Already in Place

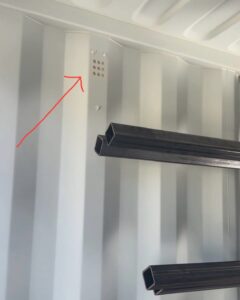
Every Rent‑A‑Container unit includes integrated air vents—standard across our fleet (seen above). As mentioned in the video, the number of vents varies from newer to older containers. These vents are:
-
Typically located near the top of the container to allow hot air and moisture to rise and escape
-
Designed to maximize passive airflow while keeping pests and water out
-
Positioned for cross-ventilation, depending on the size and model
Tips on How to Keep a Shipping Container Ventilated Naturally
Want to reduce moisture and get the most from your container’s built-in vents? Here’s what we recommend:
1. Leave a Little Space
Avoid stacking items wall-to-wall or floor-to-ceiling. Give air room to move by:
-
Keeping boxes 2–3 inches away from the walls
-
Leaving gaps between stacked pallets
-
Avoiding overpacking the container
2. Use a Moisture Control Product
If your items are sensitive to humidity (like electronics or documents), consider placing desiccants or moisture absorbers inside the container.
3. Open the Doors Periodically
If safe to do so, air out your container every week or two. This helps with air turnover—especially in extreme weather or long-term rentals.
4. Elevate Items from the Floor
Use pallets, plywood, or shelves to raise stored goods slightly. This improves airflow and helps protect against condensation on the floor.
When Built-In Ventilation Isn’t Enough to Keep Your Container Dry
In high-humidity environments or when storing moisture-sensitive materials for a long time, built-in ventilation may not be enough. In those cases:
-
You may consider portable dehumidifiers or solar fans (installed independently)
-
If you’re storing chemicals, documents, or temperature-sensitive tools, let us know—we can help you decide if a standard container is the right fit
Final Thoughts on How to Ventilate a Shipping Container
Ventilation is already built into your Rent-A-Container unit—but knowing how to make the most of it will keep your gear safer, longer.
Start with our video above, take note of these quick airflow tips, and you’ll avoid the most common moisture-related mistakes.
Need help deciding what size or model fits your storage situation? Contact us today and we’ll walk you through it.
Bonus Tip
Curious what shipping containers are made of and how they’re built int he first place? Our partner Eagle Leasing has a great blog post on what shipping containers are made of – and how they’re built.
